Korrekte Festplatte herausfinden
Erst einmal prüfen wir, wo /storage gemountet ist. Dazu greppen wir uns aus dem mount Befehl das /storage raus.
root:~# mount | grep '/storage'In unserem Fall ist /dev/vdb auf /storage eingahnagen. Nun lassen wir uns Informationen zu /dev/vdb anzeigen, um herauszufinden welchen Dateisystem Type, welche Partitionen die Festplatte hat.
root:~# fdisk -l /dev/vdb

Disk /dev/vdb: 200 GiB, 214748364800 bytes, 419430400 sectors
Units: sectors of 1 * 512 = 512 bytes
Sector size (logical/physical): 512 bytes / 512 bytes
I/O size (minimum/optimal): 512 bytes / 512 bytes
Disklabel type: dos
Disk identifier: 0xb16ec44a

Device     Boot Start       End   Sectors  Size Id Type
/dev/vdb1        2048 419430399 419428352  200G 83 Linux
Festplatte bei ProfitBricks vergrößern
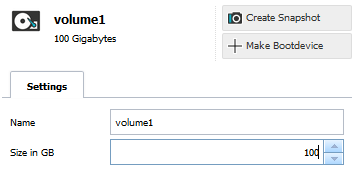
Nun ist es Zeit, das wir uns auf ProfitBricks anmelden und die Festplatte hdd2 vergrößern. Im Anschluß daran müssen die Änderungen noch aktualisiert (provisioning) werden.
Aktuelle Partition löschen
Nun verwenden wir fdisk um die Partition 1 zu löschen. Dazu geben wir in fdisk den Parameter d und wählen im Anschluß die aktuelle Partition 1.
root:~# fdisk /dev/vdb

Welcome to fdisk (util-linux 2.25.2).
Changes will remain in memory only, until you decide to write them.
Be careful before using the write command.

Command (m for help): d
Selected partition 1
Partition 1 has been deleted.
Neue Partition erstellen
Dann erstellen wir mit dem Parameter n eine neue Partition. Wir wählen im nächsten Dialog p für primary und dann als Partitionsnummer 1. Alles weitere bestätigen wir mit Enter.
Command (m for help): n
Partition type
   p   primary (0 primary, 0 extended, 4 free)
   e   extended (container for logical partitions)
Select (default p): p
Partition number (1-4, default 1): 1
First sector (2048-524287999, default 2048):
Last sector, +sectors or +size{K,M,G,T,P} (2048-524287999, default 524287999):

Created a new partition 1 of type 'Linux' and of size 250 GiB.
Nun setzen wir noch den Dateisystem Type mit den Parameter t. Mit L lassen sich alle verfügbaren anzeigen, wir verwenden 83 für Linux.
Command (m for help): t
Selected partition 1
Hex code (type L to list all codes): 83
Changed type of partition 'Linux' to 'Linux'.
Um die Änderungen abzuschließen geben wir den Parameter w für write ein.
Command (m for help): w
The partition table has been altered.
Calling ioctl() to re-read partition table.
Re-reading the partition table failed.: Device or resource busy

The kernel still uses the old table. The new table will be used at the next reboot or after you run partprobe(8) or kpartx(8).
Dem Kernel die neue Partition mitteilen
Den Hinweiß vom Kernel können wir ignorieren. Wir werden auf den Neustart verzichten und dem Kernel stattdessen mit partprobe von der neuen Partitionen erzählen.
root:~# partprobeDateisystem auf der neuen Partition erstellen
Nun vergrößern wir das Dateisystem mit resize2fs – fertig ist die Kiste 🙂
root:~# resize2fs /dev/vdb1
resize2fs 1.42.12 (29-Aug-2014)
Filesystem at /dev/vdb1 is mounted on /storage; on-line resizing required
old_desc_blocks = 13, new_desc_blocks = 16
The filesystem on /dev/vdb1 is now 65535744 (4k) blocks long.